In this post, I’ll describe the steps for how I run fMRIPrep. (sorry that this is coming before some of the earlier steps, I’m currently in the middle of this so I figured I’d document this now before I forget. I’ll get to the earlier steps later, when I work with some additional data). As an aside, through some googling, I found this github repo by a doctoral student to be very helpful for articulating some of these more details.
I tend to prefer to edit my scripts locally, so I will mount the server onto my computer so I have access to the files locally. Here is an example script below. Note that I’m using ‘singularity’ instead of ‘docker’, since I have access to fMRIPrep installed on a cluster. So if you decide to run fMRIPrep locally, you can user the docker command instead.
In my script, I plan to run both fMRIPrep and Freesurfer, with fieldmap correction (see also here) and ica-aroma.
singularity run --cleanenv \

   --bind ${bids_root_dir}/${investigator}/study-${study_label}:/data \

   --bind /gpfs/scratch/dyee7:/scratch \

   --bind /gpfs/data/bnc/licenses:/licenses \

   /gpfs/data/bnc/simgs/fmriprep/fmriprep-${fmriprep_version}.sif \

   /data/bids /data/bids/derivatives/fmriprep-${fmriprep_version}-nofs \

   participant \

   --participant-label ${pid} \

   --fs-license-file /licenses/freesurfer-license.txt \

   -w /scratch/fmriprep \

   --stop-on-first-crash \

   --nthreads 64 \

   --write-graph \

   --use-aroma \
# If you don't want to run freesurfer
   --fs-no-reconall

# If you don't have field maps, or want to do fieldmap-less correction
   --use-syn-sdc
   --force-syn

If you want to do fieldmap correction, you’re going to need to add an “IntendedFor” in your .json files for your fieldmaps. Here, because I am applying gradient echo field map, I want to apply the “phasediff” compressed nifti to all of my functional runs, so I added this argument below in alphabetical order, because I’m only a little neurotic. You’ll want to check that this file also has two Echo Times, EchoTime1 and EchoTime2.
(*It is worth noting that if you have spinecho field maps, ideally would have collected both A-P and P-A direction, if you are alternating AP and PA directions in your functional acquisition, and need to apply the opposite direction of the fieldmap to your function run. This may be more relevant if you analyze any of the connection datasets like HCP and ABCD, which default collect spinecho field maps, as well as other files like SB-refs.)
(**It is also worth noting that while there has been discussion about whether to automate this process in fMRIPrep, because there is so much variability in how fieldmaps are applied, they are deciding (as of right now) not to implement some general purpose tool (See Forum Here). There are some folks who are creating custom scripts that crawl through their data to automate this process, but it seems reasonable to me that because of the diversity of how fieldmaps are used in preprocessing, having some type of automation be project-specific or lab-specific make more sense.

When you log on the VNC, you can open a terminal window and navigate to the directory where your scripts are located. I like to use the ‘gedit‘ function to check that script is correct.
gedit TCB-fmriprep_fieldmap2_ica.sh

This is what the text file should look like, and should match the script you were editing outside of the VNC. Don’t worry if the spacing is a bit off, though it may be aesthetically unpleasant, it still works.

To look at your available scripts before running, I always like to use an ‘ls’ function.

Hooray! you are ready to run your script. You can run the script using sbatch function (or bash if you are not working on a supercomputer).
sbatch TCB-fmriprep_fieldmap2_ica.sh
If you are submitting a job on a cluster, you will also want to check that your script submitted the job and check the status of your job. More details on the Oscar website can be found here.
# check the status or your queued jobs
myq

# check the status of ongoing or recently completed jobs
sacct

Occasionally you will run into ERRORS, in which the state will say “FAILED” or “INCOMPLETE”. When it says failed, it usually means something in your scripts (or the data) prevented the script from completing without issues. However, when you see this, don’t panic! You can easily investigate what happened by looking at your log and error files. These files live in a folder in the directory where your scripts are located. As you can see at the top of my script, I included n argument to output errors and logs by the job ID (%J), which you can see easily in your status table above. (As you can see, I have a lot of logs and errors lately…)

Navigate to the folder, and you can use “ls -lt” to order your files by time and date. I used the ‘head’ argument to list only the top 20 of these recent files, since I don’t want to look at a million in my terminal window.

You can use ‘gedit’ to open the log and error files, or you can just click them open if you have the server mounted onto your desktop.
Example Log File

Example Error File

Assuming that you don’t have any major errors and that your job is completed, then your ‘derivatives folder within your BIDS folder will have the preprocessed data.

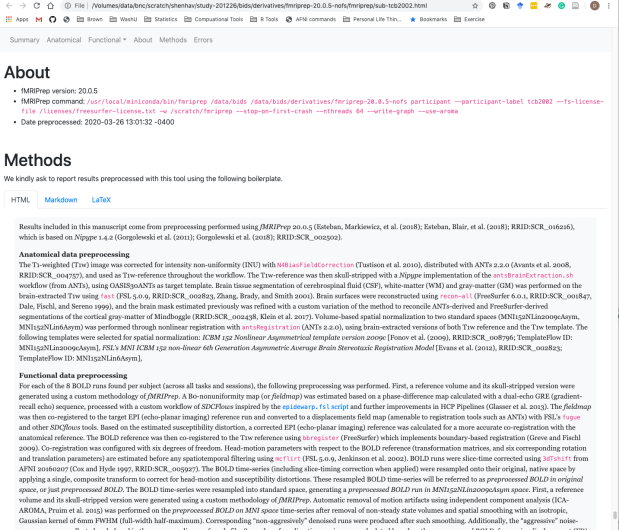
There’s a nice HTML file that gives a summary of all of the preprocessing steps, as well as some nice text about how to include these steps in your manuscript.

Happy scripting and debugging! Let me know if there are any key steps that I’ve missed here.
